Google Cloud Machine Learning : 入門編 (2) – 分散訓練 & ハイパーパラメータ調整
Google Cloud ML 入門編 (1) の続編です。先の入門編 (1) では Google Cloud ML パブリック Beta のクライアント環境のセットアップと MNIST のシングル・ワーカー・ジョブの投入までを試しました。
本記事 – 入門編 (2) では Cloud ML の TensorFlow 分散訓練の方法から始めてハイパーパラメータ調整を行ないます。予備知識として TensorFlow : How To : 分散 TensorFlow に目を通しておくと良いでしょう。
* あくまでベータですので仕様が変更される可能性はありますのでご注意ください。
(続) Training クイックスタート
クラウド上でトレーニングする : 分散
Training Quickstart の以下の項目から始めます :
Train on the cloud: distributed | Training Quickstart | Google Cloud Machine Learning
Cloud ML においてマルチワーカー上で TensorFlow モデルのトレーニング・ジョブを実行することはシングル・ワーカー上と殆ど同じくらい簡単です。先に利用した TensorFlow MNIST サンプルはシングル・ワーカー上でのトレーニングのみが可能ですが、TensorFlow : How To : 分散 TensorFlow でアドバイスされている方法によって分散トレーニングを可能にするため、アップデートします。
備考 : Cloud ML のオンライン & バッチ予測サービスをサポートするためにもまたサンプルをアップデートしています。これらについては( Prediction Quickstart のために)予測サービスに配備するモデルを保存することになります。
アップデートされたコードは以下で見つかります :
cd ~/google-cloud-ml/samples/mnist/distributed/
トレーニング・コードをローカルでテストする
最初に、モデルが(シングル・ワーカー上)ローカルでトレーニングできることを確認します :
# 以前のローカル実行からの出力をクリア
rm -rf output/
# ローカルでトレーニング
python -m trainer.task \
  --train_data_paths=gs://cloud-ml-data/mnist/train.tfr.gz \
  --eval_data_paths=gs://cloud-ml-data/mnist/eval.tfr.gz \
  --output_path=output
以下は実行結果の一部です(実際はかなり長いです) :
$ python -m trainer.task \
> --train_data_paths=gs://cloud-ml-data/mnist/train.tfr.gz \
> --eval_data_paths=gs://cloud-ml-data/mnist/eval.tfr.gz \
> --output_path=output
INFO:root:Original job data: {}
INFO:tensorflow:global_step/sec: 0
INFO:tensorflow:global_step/sec: 0
INFO:root:Train [master/0], step 1: loss: 2.312, accuracy: 0.040 (0.126 sec) 7.9 global steps/s, 7.9 local steps/s
INFO:root:Eval, step 1: loss: 2.298, accuracy: 0.094
INFO:root:Train [master/0], step 145: loss: 1.997, accuracy: 0.386 (3.407 sec) 43.9 global steps/s, 43.9 local steps/s
INFO:root:Eval, step 145: loss: 1.683, accuracy: 0.550
INFO:root:Adjusting eval interval from 1.00s to 1.39s
INFO:root:Train [master/0], step 288: loss: 1.697, accuracy: 0.528 (5.804 sec) 59.7 global steps/s, 59.7 local steps/s
INFO:root:Train [master/0], step 341: loss: 1.592, accuracy: 0.569 (6.189 sec) 137.6 global steps/s, 137.6 local steps/s
INFO:root:Eval, step 341: loss: 0.908, accuracy: 0.816
INFO:root:Train [master/0], step 482: loss: 1.362, accuracy: 0.642 (8.503 sec) 60.9 global steps/s, 60.9 local steps/s
INFO:root:Train [master/0], step 536: loss: 1.286, accuracy: 0.665 (8.889 sec) 140.1 global steps/s, 140.1 local steps/s
INFO:root:Eval, step 536: loss: 0.601, accuracy: 0.857

(... 略 ...)

INFO:root:Train [master/0], step 4908: loss: 0.428, accuracy: 0.882 (245.001 sec) 26.9 global steps/s, 26.9 local steps/s
INFO:root:Train [master/0], step 4934: loss: 0.427, accuracy: 0.882 (246.208 sec) 21.5 global steps/s, 21.5 local steps/s
INFO:root:Train [master/0], step 4944: loss: 0.427, accuracy: 0.883 (246.484 sec) 36.3 global steps/s, 36.3 local steps/s
INFO:root:Eval, step 4944: loss: 0.236, accuracy: 0.935
INFO:root:Train [master/0], step 4969: loss: 0.426, accuracy: 0.883 (253.471 sec) 3.6 global steps/s, 3.6 local steps/s
INFO:root:Train [master/0], step 4991: loss: 0.425, accuracy: 0.883 (254.472 sec) 22.0 global steps/s, 22.0 local steps/s
INFO:root:Exporting prediction graph to output/model
INFO:root:Final metrics after 5000 steps, loss: 0.236, accuracy: 0.934
トレーニング・ジョブを submit する
トレーニング・ジョブのための名前を選択します、e.g. “mnist_distributed_yourusername”。
英字で始まり英数字とアンダースコアのみを含めることができます。
JOB_NAME=<your job name>
以前のクラウド実行からの出力をクリアしておきます :
PROJECT_ID=`gcloud config list project --format "value(core.project)"`
TRAIN_BUCKET=gs://${PROJECT_ID}-ml
TRAIN_PATH=${TRAIN_BUCKET}/${JOB_NAME}
gsutil rm -rf ${TRAIN_PATH}
単純な config ファイルを作成します、これは Cloud ML STANDARD_1 scale tier(= 多くのワーカーと2、3 (= a few) のパラメータ・サーバ)を指定するものです :
cat << EOF > config.yaml
trainingInput:
  # Use a cluster with many workers and a few parameter servers.
  scaleTier: STANDARD_1
EOF
そして最後にトレーニング・ジョブを submit します :
gcloud beta ml jobs submit training ${JOB_NAME} \
  --package-path=trainer \
  --module-name=trainer.task \
  --staging-bucket="${TRAIN_BUCKET}" \
  --region=us-central1 \
  --config=config.yaml \
  -- \
  --train_data_paths="gs://cloud-ml-data/mnist/train.tfr.gz" \
  --eval_data_paths="gs://cloud-ml-data/mnist/eval.tfr.gz" \
  --output_path="${TRAIN_PATH}/output"
実際に実行してみます :
$ gcloud beta ml jobs submit training ${JOB_NAME} \
>   --package-path=trainer \
>   --module-name=trainer.task \
>   --staging-bucket="${TRAIN_BUCKET}" \
>   --region=us-central1 \
>   --config=config.yaml \
>   -- \
>   --train_data_paths="gs://cloud-ml-data/mnist/train.tfr.gz" \
>   --eval_data_paths="gs://cloud-ml-data/mnist/eval.tfr.gz" \
>   --output_path="${TRAIN_PATH}/output"
createTime: '2016-10-17T09:05:49Z'
jobId: mnist_distributed_classcat
state: QUEUED
trainingInput:
  args:
  - --train_data_paths=gs://cloud-ml-data/mnist/train.tfr.gz
  - --eval_data_paths=gs://cloud-ml-data/mnist/eval.tfr.gz
  - --output_path=gs://classcat-tensorflow-ml/mnist_distributed_classcat/output
  packageUris:
  - gs://classcat-tensorflow-ml/cloudmldist/1476695147/trainer-0.0.0.tar.gz
  pythonModule: trainer.task
  region: us-central1
  scaleTier: STANDARD_1
ステータス確認。もちろん Cloud Platform コンソールからも確認できます :
$ gcloud beta ml jobs describe --project ${PROJECT_ID} ${JOB_NAME}
createTime: '2016-10-17T09:05:49Z'
jobId: mnist_distributed_classcat
startTime: '2016-10-17T09:06:25Z'
state: RUNNING
trainingInput:
  args:
  - --train_data_paths=gs://cloud-ml-data/mnist/train.tfr.gz
  - --eval_data_paths=gs://cloud-ml-data/mnist/eval.tfr.gz
  - --output_path=gs://classcat-tensorflow-ml/mnist_distributed_classcat/output
  packageUris:
  - gs://classcat-tensorflow-ml/cloudmldist/1476695147/trainer-0.0.0.tar.gz
  pythonModule: trainer.task
  region: us-central1
  scaleTier: STANDARD_1
成功しました :
$ gcloud beta ml jobs describe --project ${PROJECT_ID} ${JOB_NAME}
createTime: '2016-10-17T09:05:49Z'
endTime: '2016-10-17T09:13:17Z'
jobId: mnist_distributed_classcat
startTime: '2016-10-17T09:06:25Z'
state: SUCCEEDED
trainingInput:
  args:
  - --train_data_paths=gs://cloud-ml-data/mnist/train.tfr.gz
  - --eval_data_paths=gs://cloud-ml-data/mnist/eval.tfr.gz
  - --output_path=gs://classcat-tensorflow-ml/mnist_distributed_classcat/output
  packageUris:
  - gs://classcat-tensorflow-ml/cloudmldist/1476695147/trainer-0.0.0.tar.gz
  pythonModule: trainer.task
  region: us-central1
  scaleTier: STANDARD_1
出力を inspect する
この例では出力は ${TRAIN_PATH}/output に保存されていますので、リストを取るには ”
gsutil ls ${TRAIN_PATH}/output” を実行します :
$ gsutil ls $TRAIN_PATH/output
gs://classcat-tensorflow-ml/mnist_distributed_classcat/output/checkpoint
gs://classcat-tensorflow-ml/mnist_distributed_classcat/output/events.out.tfevents.1476695558.master-63d9-0-ytvx3
gs://classcat-tensorflow-ml/mnist_distributed_classcat/output/events.out.tfevents.1476695559.master-63d9-0-ytvx3
gs://classcat-tensorflow-ml/mnist_distributed_classcat/output/events.out.tfevents.1476695560.master-63d9-0-ytvx3
gs://classcat-tensorflow-ml/mnist_distributed_classcat/output/events.out.tfevents.1476695562.master-63d9-0-ytvx3
gs://classcat-tensorflow-ml/mnist_distributed_classcat/output/events.out.tfevents.1476695564.master-63d9-0-ytvx3
gs://classcat-tensorflow-ml/mnist_distributed_classcat/output/events.out.tfevents.1476695566.master-63d9-0-ytvx3
gs://classcat-tensorflow-ml/mnist_distributed_classcat/output/events.out.tfevents.1476695568.master-63d9-0-ytvx3
gs://classcat-tensorflow-ml/mnist_distributed_classcat/output/events.out.tfevents.1476695571.master-63d9-0-ytvx3
gs://classcat-tensorflow-ml/mnist_distributed_classcat/output/events.out.tfevents.1476695573.master-63d9-0-ytvx3
gs://classcat-tensorflow-ml/mnist_distributed_classcat/output/events.out.tfevents.1476695575.master-63d9-0-ytvx3
gs://classcat-tensorflow-ml/mnist_distributed_classcat/output/events.out.tfevents.1476695578.master-63d9-0-ytvx3
gs://classcat-tensorflow-ml/mnist_distributed_classcat/output/events.out.tfevents.1476695580.master-63d9-0-ytvx3
gs://classcat-tensorflow-ml/mnist_distributed_classcat/output/events.out.tfevents.1476695583.master-63d9-0-ytvx3
gs://classcat-tensorflow-ml/mnist_distributed_classcat/output/events.out.tfevents.1476695585.master-63d9-0-ytvx3
gs://classcat-tensorflow-ml/mnist_distributed_classcat/output/export
gs://classcat-tensorflow-ml/mnist_distributed_classcat/output/export.meta
gs://classcat-tensorflow-ml/mnist_distributed_classcat/output/graph.pbtxt
gs://classcat-tensorflow-ml/mnist_distributed_classcat/output/model.ckpt-2496
gs://classcat-tensorflow-ml/mnist_distributed_classcat/output/model.ckpt-2496.meta
gs://classcat-tensorflow-ml/mnist_distributed_classcat/output/model.ckpt-3117
gs://classcat-tensorflow-ml/mnist_distributed_classcat/output/model.ckpt-3117.meta
gs://classcat-tensorflow-ml/mnist_distributed_classcat/output/model.ckpt-4018
gs://classcat-tensorflow-ml/mnist_distributed_classcat/output/model.ckpt-4018.meta
gs://classcat-tensorflow-ml/mnist_distributed_classcat/output/model.ckpt-5006
Stackdriver ログを inspect する
マルチ・ワーカー上でモデルがトレーニングされたことを確認するために Stackdriver ロギングが使用できます。
ジョブのログを見つける最も簡単な方法は(シングル・ワーカー上の場合と同じように)Cloud Platform コンソールで「ログを表示」をクリックすることです。「すべてのログ」ドロップダウンの中から master-replica-0 をクリックすると、以下のようなログが閲覧できます :

次に master-replicat-0 の代わりに worker-replica-0 を選択すると、次のようなログが閲覧できます :

alternative として、コマンドライン上でもログを読むことができます :
gcloud beta logging read --project ${PROJECT_ID} --format=json \
  "labels.\"ml.googleapis.com/task_name\"=\"master-replica-0\" AND \
   labels.\"ml.googleapis.com/job_id\"=\"${JOB_NAME}\""
以下は実行例です :
$ gcloud beta logging read --project ${PROJECT_ID} --format=json   "labels.\"ml.googleapis
.com/task_name\"=\"master-replica-0\" AND \
   labels.\"ml.googleapis.com/job_id\"=\"${JOB_NAME}\"" | head -40
[
  {
    "insertId": "15cxtb6f1ae12i",
    "jsonPayload": {
      "created": 1476695587.16638,
      "levelname": "INFO",
      "lineno": 690,
      "message": "Task completed successfully.",
      "pathname": "/runcloudml.py"
    },
    "labels": {
      "compute.googleapis.com/resource_id": "6857495858232852682",
      "compute.googleapis.com/resource_name": "master-63d9-0-ytvx3",
      "compute.googleapis.com/resource_type": "instance",
      "ml.googleapis.com/job_id": "mnist_distributed_classcat",
      "ml.googleapis.com/job_id/log_area": "root",
      "ml.googleapis.com/task_name": "master-replica-0",
      "ml.googleapis.com/trial_id": ""
    },
    "logName": "projects/classcat-tensorflow/logs/master-replica-0",
    "resource": {
      "labels": {
        "job_id": "mnist_distributed_classcat",
        "task_name": "master-replica-0"
      },
      "type": "ml_job"
    },
    "severity": "INFO",
    "timestamp": "2016-10-17T09:13:07.166379928Z"
  },
  {
    "insertId": "15cxtb6f1ae12h",
    "jsonPayload": {
      "created": 1476695587.16607,
      "levelname": "INFO",
      "lineno": 688,
      "message": "Clean up finished.",
      "pathname": "/runcloudml.py"
    },
    "labels": {
要約ログを inspect する
この例のために TensorBoard を実行するには、”–logdir=${TRAIN_PATH}/output” を指定すれば良いです :
$ echo ${TRAIN_PATH}
gs://classcat-tensorflow-ml/mnist_distributed_classcat
$ tensorboard --logdir=${TRAIN_PATH}/output --port 8080
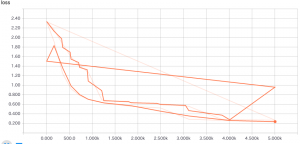
以下は損失グラフ :
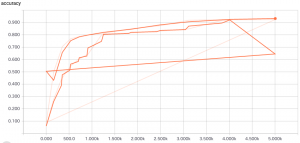
そして精度グラフです :
クラウド上でトレーニングする : ハイパーパラメータ調整
最後に、(この場合は)以下のより良い値を自動的に見つけることによりモデル精度をあげるためにハイパーパラメータ調整を利用できます :
- 2つの隠れ層のサイズ
- 学習率
ハイパーパラメータ調整を有効にするためには、前のセクションで使用したサンプルコードに小さな変更を行なう必要があります。興味があれば、これらの変更は Increasing Model Accuracy with Hyperparameter Tuning how-to に記述されていますが、このクイックスタートのためには既に変更を行なっています; 単に作業ディレクトリを ~/google-cloud-ml/samples/mnist/hptuning/ に移してください :
cd ~/google-cloud-ml/samples/mnist/hptuning/
トレーニング・コードをローカルでテストする
最初に、モデルを(ハイパーパラメータ調整なし、シングルワーカー上の)ローカルでトレーニング可能なことを確認します :
# Clear the output from any previous local run.
rm -rf output/
# Train locally.
python -m trainer.task \
  --train_data_paths=gs://cloud-ml-data/mnist/train.tfr.gz \
  --eval_data_paths=gs://cloud-ml-data/mnist/eval.tfr.gz \
  --output_path=output
上記の分散トレーニングのためのローカル実行からの出力と同様の出力を見るはずです。
実際の出力は以下のような感じです :
INFO:root:Original job data: {}
INFO:tensorflow:global_step/sec: 0
INFO:tensorflow:global_step/sec: 0
INFO:root:Train [master/0], step 1: loss: 2.322, accuracy: 0.100 (0.117 sec) 8.5 global steps/s, 8.5 local steps/s
INFO:root:Eval, step 1: loss: 2.312, accuracy: 0.108
INFO:root:Train [master/0], step 1352: loss: 0.973, accuracy: 0.742 (12.467 sec) 109.4 global steps/s, 109.4 local steps/s
INFO:root:Eval, step 1352: loss: 0.593, accuracy: 0.846
INFO:root:Train [master/0], step 2626: loss: 0.775, accuracy: 0.801 (24.021 sec) 110.3 global steps/s, 110.3 local steps/s
INFO:root:Eval, step 2626: loss: 0.512, accuracy: 0.887
INFO:root:Train [master/0], step 3914: loss: 0.687, accuracy: 0.830 (35.433 sec) 112.9 global steps/s, 112.9 local steps/s
INFO:root:Eval, step 3914: loss: 0.479, accuracy: 0.899
INFO:root:Exporting prediction graph to output/model
INFO:root:Final metrics after 5000 steps, loss: 0.455, accuracy: 0.908
トレーニング・ジョブを submit する
トレーニング・ジョブのための名前を選択します、e.g. “mnist_hptuning_yourusername”。
英字から始まり英数字とアンダースコアを含みます。
JOB_NAME=<your job name>
以前のクラウド実行からの出力をクリアしておきます :
PROJECT_ID=`gcloud config list project --format "value(core.project)"`
TRAIN_BUCKET=gs://${PROJECT_ID}-ml  # gs://ccml-beta-ml
TRAIN_PATH=${TRAIN_BUCKET}/${JOB_NAME}  # gs://ccml-beta-ml/mnist_hptunint_classcat
gsutil rm -rf ${TRAIN_PATH}
最適化したい ハイパーパラメータ と scale tier を指定する config ファイルを作成します :
cat << EOF > config.yaml
trainingInput:
  # Use a cluster with many workers and a few parameter servers.
  scaleTier: STANDARD_1
  # Hyperparameter-tuning specification.
  hyperparameters:
    # Maximize the objective value.
    goal: MAXIMIZE
    # Run at most 10 trials with different hyperparameters.
    maxTrials: 10
    # Run two trials at a time.
    maxParallelTrials: 2
    params:
      # Allow the size of the first hidden layer to vary between 40 and 400.
      # One value in this range will be passed to each trial via the
      # --hidden1 command-line flag.
      - parameterName: hidden1
        type: INTEGER
        minValue: 40
        maxValue: 400
        scaleType: UNIT_LINEAR_SCALE
      # Allow the size of the second hidden layer to vary between 5 and 250.
      # One value in this range will be passed to each trial via the
      # --hidden2 command-line flag.
      - parameterName: hidden2
        type: INTEGER
        minValue: 5
        maxValue: 250
        scaleType: UNIT_LINEAR_SCALE
      # Allow the learning rate to vary between 0.0001 and 0.5.
      # One value in this range will be passed to each trial via the
      # --learning_rate command-line flag.
      - parameterName: learning_rate
        type: DOUBLE
        minValue: 0.0001
        maxValue: 0.5
        scaleType: UNIT_LOG_SCALE
EOF
最後に、トレーニング・ジョブを submit します :
gcloud beta ml jobs submit training ${JOB_NAME} \
  --package-path=trainer \
  --module-name=trainer.task \
  --staging-bucket="${TRAIN_BUCKET}" \
  --region=us-central1 \
  --config=config.yaml \
  -- \
  --train_data_paths="gs://cloud-ml-data/mnist/train.tfr.gz" \
  --eval_data_paths="gs://cloud-ml-data/mnist/eval.tfr.gz" \
  --output_path="${TRAIN_PATH}/output"
このコマンドは、ハイパーパラメータ調整の指定を追加した点を除けば、上述の分散トレーニングのために使ったものと同じです。
実行直後です :
createTime: '2016-10-22T14:03:36Z'
jobId: mnist_hptunint_classcat
state: QUEUED
trainingInput:
  args:
  - --train_data_paths=gs://cloud-ml-data/mnist/train.tfr.gz
  - --eval_data_paths=gs://cloud-ml-data/mnist/eval.tfr.gz
  - --output_path=gs://ccml-beta-ml/mnist_hptunint_classcat/output
  hyperparameters:
    goal: MAXIMIZE
    maxParallelTrials: 2
    maxTrials: 10
    params:
    - maxValue: 400.0
      minValue: 40.0
      parameterName: hidden1
      scaleType: UNIT_LINEAR_SCALE
      type: INTEGER
    - maxValue: 250.0
      minValue: 5.0
      parameterName: hidden2
      scaleType: UNIT_LINEAR_SCALE
      type: INTEGER
    - maxValue: 0.5
      minValue: 0.0001
      parameterName: learning_rate
      scaleType: UNIT_LOG_SCALE
      type: DOUBLE
  packageUris:
  - gs://ccml-beta-ml/cloudmldist/1477145014/trainer-0.0.0.tar.gz
  pythonModule: trainer.task
  region: us-central1
  scaleTier: STANDARD_1
トレーニング・ジョブの終了を待つ
ジョブの進行をチェックして終了することを待ちます :
gcloud beta ml jobs describe --project ${PROJECT_ID} ${JOB_NAME}
ジョブが完了すればステート SUCCEEDED が確認できます。
ドキュメントにはおよそ 20 分かかるとありましたが、実際のジョブ実行時間は 27 分かかりました。以下は成功後の出力です :
$ gcloud beta ml jobs describe --project ${PROJECT_ID} ${JOB_NAME}
createTime: '2016-10-22T14:03:36Z'
endTime: '2016-10-22T14:30:40Z'
jobId: mnist_hptunint_classcat
startTime: '2016-10-22T14:03:38Z'
state: SUCCEEDED
trainingInput:
  args:
  - --train_data_paths=gs://cloud-ml-data/mnist/train.tfr.gz
  - --eval_data_paths=gs://cloud-ml-data/mnist/eval.tfr.gz
  - --output_path=gs://ccml-beta-ml/mnist_hptunint_classcat/output
  hyperparameters:
    goal: MAXIMIZE
    maxParallelTrials: 2
    maxTrials: 10
    params:
    - maxValue: 400.0
      minValue: 40.0
      parameterName: hidden1
      scaleType: UNIT_LINEAR_SCALE
      type: INTEGER
    - maxValue: 250.0
      minValue: 5.0
      parameterName: hidden2
      scaleType: UNIT_LINEAR_SCALE
      type: INTEGER
    - maxValue: 0.5
      minValue: 0.0001
      parameterName: learning_rate
      scaleType: UNIT_LOG_SCALE
      type: DOUBLE
  packageUris:
  - gs://ccml-beta-ml/cloudmldist/1477145014/trainer-0.0.0.tar.gz
  pythonModule: trainer.task
  region: us-central1
  scaleTier: STANDARD_1
trainingOutput:
  completedTrialCount: '10'
  trials:
  - finalMetric:
      objectiveValue: 1.0
      trainingStep: '801'
    hyperparameters:
      hidden1: '400'
      hidden2: '243'
      learning_rate: '0.35743598509131963'
    trialId: '2'
  - finalMetric:
      objectiveValue: 1.0
      trainingStep: '155'
    hyperparameters:
      hidden1: '400'
      hidden2: '78'
      learning_rate: '0.46075871302559684'
    trialId: '4'
  - finalMetric:
      objectiveValue: 1.0
      trainingStep: '59'
    hyperparameters:
      hidden1: '318'
      hidden2: '156'
      learning_rate: '0.49635208597915981'
    trialId: '7'
  - finalMetric:
      objectiveValue: 1.0
      trainingStep: '77'
    hyperparameters:
      hidden1: '400'
      hidden2: '171'
      learning_rate: '0.40330855230836954'
    trialId: '9'
  - finalMetric:
      objectiveValue: 0.9635
      trainingStep: '57'
    hyperparameters:
      hidden1: '202'
      hidden2: '250'
      learning_rate: '0.062366331313038155'
    trialId: '10'
  - finalMetric:
      objectiveValue: 0.9632
      trainingStep: '53'
    hyperparameters:
      hidden1: '400'
      hidden2: '199'
      learning_rate: '0.028588163150300036'
    trialId: '5'
  - finalMetric:
      objectiveValue: 0.9573
      trainingStep: '65'
    hyperparameters:
      hidden1: '169'
      hidden2: '24'
      learning_rate: '0.47690789477002721'
    trialId: '8'
  - finalMetric:
      objectiveValue: 0.9515
      trainingStep: '47'
    hyperparameters:
      hidden1: '68'
      hidden2: '175'
      learning_rate: '0.49684846231717211'
    trialId: '6'
  - finalMetric:
      objectiveValue: 0.7194
      trainingStep: '687'
    hyperparameters:
      hidden1: '134'
      hidden2: '87'
      learning_rate: '0.000949340820855901'
    trialId: '1'
  - finalMetric:
      objectiveValue: 0.3354
      trainingStep: '254'
    hyperparameters:
      hidden1: '399'
      hidden2: '19'
      learning_rate: '0.00010892698020942698'
    trialId: '3'
この出力は 10 試行の各々に使用されたハイパーパラメータと、目的値 (= objective value) (この場合は精度)を含みます。目的値によりソートされています。
出力を inspect する
このサンプルでは、出力は ${TRAIN_PATH}/output に保存されます :
gsutil ls ${TRAIN_PATH}/output
各試行のための 10 個の出力ディレクトリが見てとれます :
$ gsutil ls ${TRAIN_PATH}/output/
gs://ccml-beta-ml/mnist_hptunint_classcat/output/1/
gs://ccml-beta-ml/mnist_hptunint_classcat/output/10/
gs://ccml-beta-ml/mnist_hptunint_classcat/output/2/
gs://ccml-beta-ml/mnist_hptunint_classcat/output/3/
gs://ccml-beta-ml/mnist_hptunint_classcat/output/4/
gs://ccml-beta-ml/mnist_hptunint_classcat/output/5/
gs://ccml-beta-ml/mnist_hptunint_classcat/output/6/
gs://ccml-beta-ml/mnist_hptunint_classcat/output/7/
gs://ccml-beta-ml/mnist_hptunint_classcat/output/8/
gs://ccml-beta-ml/mnist_hptunint_classcat/output/9/

$ gsutil ls ${TRAIN_PATH}/output/10
gs://ccml-beta-ml/mnist_hptunint_classcat/output/10/checkpoint
gs://ccml-beta-ml/mnist_hptunint_classcat/output/10/events.out.tfevents.1477146511.master-f3ea-0-5rb4e
gs://ccml-beta-ml/mnist_hptunint_classcat/output/10/events.out.tfevents.1477146512.master-f3ea-0-5rb4e
gs://ccml-beta-ml/mnist_hptunint_classcat/output/10/events.out.tfevents.1477146523.master-f3ea-0-5rb4e
gs://ccml-beta-ml/mnist_hptunint_classcat/output/10/events.out.tfevents.1477146524.master-f3ea-0-5rb4e
gs://ccml-beta-ml/mnist_hptunint_classcat/output/10/events.out.tfevents.1477146534.master-f3ea-0-5rb4e
gs://ccml-beta-ml/mnist_hptunint_classcat/output/10/events.out.tfevents.1477146535.master-f3ea-0-5rb4e
gs://ccml-beta-ml/mnist_hptunint_classcat/output/10/export
gs://ccml-beta-ml/mnist_hptunint_classcat/output/10/export.meta
gs://ccml-beta-ml/mnist_hptunint_classcat/output/10/graph.pbtxt
gs://ccml-beta-ml/mnist_hptunint_classcat/output/10/model.ckpt-1
gs://ccml-beta-ml/mnist_hptunint_classcat/output/10/model.ckpt-1.meta
gs://ccml-beta-ml/mnist_hptunint_classcat/output/10/model.ckpt-1771
gs://ccml-beta-ml/mnist_hptunint_classcat/output/10/model.ckpt-1771.meta
gs://ccml-beta-ml/mnist_hptunint_classcat/output/10/model.ckpt-5007
要約ログを inspect する
例えば –logdir=${TRAIN_PATH}/output/1 で TensorBoard が利用できます。
以下はまとめて閲覧したところです :


以下は結果の良かった Id 2 のグラフです :

ここまでで Training クイックスタートを通して動作確認したことになります。
以上