AG-UI と Mastra を使用して、対話型 CLI エージェントをゼロから構築します。クライアント実装は、AG-UI のイベント駆動型プロトコルを活用した対話型アプリケーションを構築することを可能にします。
AG-UI : Get Started – クイックスタート : クライアントの構築
作成 : Masashi Okumura (@classcat.com)
作成日時 : 04/16/2026
バージョン : v0.0.52
* 本記事は docs.ag-ui.com の以下のページを参考にしています :
* サンプルコードの動作確認はしておりますが、必要な場合には適宜、追加改変しています。

◆ お問合せ : 下記までお願いします。
- クラスキャット セールス・インフォメーション
- sales-info@classcat.com
- ClassCatJP
AG-UI : Get Started – クイックスタート : クライアントの構築
デモ: AG-UI と Mastra を使用して、対話型 CLI エージェントをゼロから構築します。
イントロダクション
クライアント実装は、AG-UI のイベント駆動型プロトコルを活用した対話型アプリケーションを構築することを可能にします。このアプローチは、ユーザと AI エージェント間の直接的なインターフェースを作成し、AG-UI プロトコルへの直接アクセスを実演します。
クライアント実装を使うべき時
AG-UI プロトコルを探求/ハッキングしたい場合は、独自のクライアントを構築するのが役立ちます。本番環境での使用には、CopilotKit のようなフル機能のクライアントを使用してください。
構築するもの
このガイドでは、以下のような CLI クライアントを作成します :
- @ag-ui/mastra の MastraAgent を使用する
- OpenAI の GPT-4o モデルに接続する
- 実世界の機能として天気予報ツールを実装する
- ターミナルで対話型のチャットインターフェースを提供する
Let’s get started!
前提条件
始める前に、以下を確認してください :
- Node.js 22.13.0 or later
- OpenAI API キー
- pnpm パッケージマネージャー
1. OpenAI API キーの提供
まず、API キーをセットアップしましょう :
# Set your OpenAI API key
export OPENAI_API_KEY=your-api-key-here
2. pnpm のインストール
If you don’t have pnpm installed:
# Install pnpm
npm install -g pnpm
Step 1 – プロジェクトの初期化
AG-UI クライアント用の新しいディレクトリを作成します :
mkdir my-ag-ui-client
cd my-ag-ui-client
Initialize a new Node.js project:
pnpm init
TypeScript のセットアップと基本設定
TypeScript と不可欠な開発依存関係をインストールします :
pnpm add -D typescript @types/node tsx
Create a tsconfig.json file :
{
  "compilerOptions": {
    "target": "ES2022",
    "module": "commonjs",
    "lib": ["ES2022"],
    "outDir": "./dist",
    "rootDir": "./src",
    "strict": true,
    "esModuleInterop": true,
    "skipLibCheck": true,
    "forceConsistentCasingInFileNames": true,
    "resolveJsonModule": true
  },
  "include": ["src/**/*"],
  "exclude": ["node_modules", "dist"]
}
Update your package.json scripts:
{
  "scripts": {
    "start": "tsx src/index.ts",
    "dev": "tsx --watch src/index.ts",
    "build": "tsc",
    "clean": "rm -rf dist"
  }
}
Step 2 – AG-UI と依存関係のインストール
AG-UI コアパッケージと依存関係をインストールします :
# Core AG-UI packages
pnpm add @ag-ui/client @ag-ui/core @ag-ui/mastra

# Mastra ecosystem packages
pnpm add @mastra/core @mastra/client-js @mastra/memory @mastra/libsql

# Mastra peer dependencies
pnpm add zod
Step 3 – エージェントの作成
基本的な対話型エージェントを作成しましょう。src/agent.ts を作成します :
import { Agent } from "@mastra/core/agent"
import { MastraAgent } from "@ag-ui/mastra"
import { Memory } from "@mastra/memory"
import { LibSQLStore } from "@mastra/libsql"

export const agent = new MastraAgent({
  resourceId: "cliExample",
  agent: new Agent({
    id: "ag-ui-assistant",
    name: "AG-UI Assistant",
    instructions: `
      You are a helpful AI assistant. Be friendly, conversational, and helpful.
      Answer questions to the best of your ability and engage in natural conversation.
    `,
    model: "openai/gpt-4o",
    memory: new Memory({
      storage: new LibSQLStore({
        id: "storage-memory",
        url: "file:./assistant.db",
      }),
    }),
  }),
  threadId: "main-conversation",
})
エージェント内部で何が起こっているのか?
- MastraAgent – Mastra エージェントを AG-UI プロトコルアダプタでラップしています
- モデル構成 – 高品質なレスポンスを得るために、OpenAI の GPT-4o を使用しています。
- メモリ設定 – 会話コンテキストのために、LibSQL を使用して永続メモリを構成しています。
- 指示 (Instructions) – エージェントが有益な会話を行うための基本的なガイドラインを提供しています。
Step 4 – CLI インターフェイスの作成
次に、対話型チャットインターフェースを作成しましょう。src/index.tsファイルを作成します :
import * as readline from "readline"
import { agent } from "./agent"
import { randomUUID } from "@ag-ui/client"

const rl = readline.createInterface({
  input: process.stdin,
  output: process.stdout,
})

async function chatLoop() {
  console.log("🤖 AG-UI Assistant started!")
  console.log("Type your messages and press Enter. Press Ctrl+D to quit.\n")

  return new Promise((resolve) => {
    const promptUser = () => {
      rl.question("> ", async (input) => {
        if (input.trim() === "") {
          promptUser()
          return
        }
        console.log("")

        // Pause input while processing
        rl.pause()

        // Add user message to conversation
        agent.messages.push({
          id: randomUUID(),
          role: "user",
          content: input.trim(),
        })

        try {
          // Run the agent with event handlers
          await agent.runAgent(
            {}, // No additional configuration needed
            {
              onTextMessageStartEvent() {
                process.stdout.write("🤖 Assistant: ")
              },
              onTextMessageContentEvent({ event }) {
                process.stdout.write(event.delta)
              },
              onTextMessageEndEvent() {
                console.log("\n")
              },
            }
          )
        } catch (error) {
          console.error("❌ Error:", error)
        }

        // Resume input
        rl.resume()
        promptUser()
      })
    }

    // Handle Ctrl+D to quit
    rl.on("close", () => {
      console.log("\n👋 Thanks for using AG-UI Assistant!")
      resolve()
    })

    promptUser()
  })
}

async function main() {
  await chatLoop()
}

main().catch(console.error)
CLI インターフェースで何が起こっているのか?
- Readline インターフェース – ユーザー入力のための対話型プロンプトを作成します
- メッセージ管理 – 各々のユーザー入力をエージェントの会話履歴に追加します
- イベント処理 – AG-UI イベントを監視してリアルタイムのフィードバックを提供します
- ストリーミング表示 – エージェントのレスポンスが生成されると同時に表示します
Step 5 – アシスタントのテスト
新しい AG-UI クライアントを実行してみましょう :
pnpm dev
You should see:
🤖 AG-UI Assistant started!
Type your messages and press Enter. Press Ctrl+D to quit.

>
Try asking questions like:
- “Hello! How are you?”
- “What can you help me with?”
- “Tell me a joke”
- “Explain quantum computing in simple terms”
You’ll see the agent respond with streaming text in real-time!
Step 6 – AG-UI イベントフローの理解
メッセージを送信した際に何が起こるのかを細分化してみましょう :
- ユーザー入力 – 質問を入力して Enter キーを押します
- メッセージが追加される – 入力が会話履歴に追加されます
- エージェント処理 – エージェントがリクエストを分析し、レスポンスを作成します
- レスポンス生成 – エージェントがレスポンスをストリーミングで返します
- ストリーミング出力 – レスポンスが単語毎に表示されます
処理するイベントのタイプ
- onTextMessageStartEvent – エージェントがレスポンスを開始
- onTextMessageContentEvent – レスポンスの各チャンク
- onTextMessageEndEvent – レスポンスが完了
Step 7 – ツール機能の追加
動作するチャットインターフェースを実装したので、ツールを作成して現実的な機能を追加しましょう。まずは天気予報ツールから始めます。
最初のツールの作成
エージェントが使用できる天気予報ツールを作成しましょう。ディレクトリ構造を作成します :
mkdir -p src/tools
Create src/tools/weather.tool.ts:
import { createTool } from "@mastra/core/tools"
import { z } from "zod"

interface GeocodingResponse {
  results: {
    latitude: number
    longitude: number
    name: string
  }[]
}

interface WeatherResponse {
  current: {
    time: string
    temperature_2m: number
    apparent_temperature: number
    relative_humidity_2m: number
    wind_speed_10m: number
    wind_gusts_10m: number
    weather_code: number
  }
}

export const weatherTool = createTool({
  id: "get-weather",
  description: "Get current weather for a location",
  inputSchema: z.object({
    location: z.string().describe("City name"),
  }),
  outputSchema: z.object({
    temperature: z.number(),
    feelsLike: z.number(),
    humidity: z.number(),
    windSpeed: z.number(),
    windGust: z.number(),
    conditions: z.string(),
    location: z.string(),
  }),
  execute: async (inputData) => {
    return await getWeather(inputData.location)
  },
})

const getWeather = async (location: string) => {
  const geocodingUrl = `https://geocoding-api.open-meteo.com/v1/search?name=${encodeURIComponent(
    location
  )}&count=1`
  const geocodingResponse = await fetch(geocodingUrl)
  const geocodingData = (await geocodingResponse.json()) as GeocodingResponse

  if (!geocodingData.results?.[0]) {
    throw new Error(`Location '${location}' not found`)
  }

  const { latitude, longitude, name } = geocodingData.results[0]

  const weatherUrl = `https://api.open-meteo.com/v1/forecast?latitude=${latitude}&longitude=${longitude}¤t=temperature_2m,apparent_temperature,relative_humidity_2m,wind_speed_10m,wind_gusts_10m,weather_code`

  const response = await fetch(weatherUrl)
  const data = (await response.json()) as WeatherResponse

  return {
    temperature: data.current.temperature_2m,
    feelsLike: data.current.apparent_temperature,
    humidity: data.current.relative_humidity_2m,
    windSpeed: data.current.wind_speed_10m,
    windGust: data.current.wind_gusts_10m,
    conditions: getWeatherCondition(data.current.weather_code),
    location: name,
  }
}

function getWeatherCondition(code: number): string {
  const conditions: Record = {
    0: "Clear sky",
    1: "Mainly clear",
    2: "Partly cloudy",
    3: "Overcast",
    45: "Foggy",
    48: "Depositing rime fog",
    51: "Light drizzle",
    53: "Moderate drizzle",
    55: "Dense drizzle",
    56: "Light freezing drizzle",
    57: "Dense freezing drizzle",
    61: "Slight rain",
    63: "Moderate rain",
    65: "Heavy rain",
    66: "Light freezing rain",
    67: "Heavy freezing rain",
    71: "Slight snow fall",
    73: "Moderate snow fall",
    75: "Heavy snow fall",
    77: "Snow grains",
    80: "Slight rain showers",
    81: "Moderate rain showers",
    82: "Violent rain showers",
    85: "Slight snow showers",
    86: "Heavy snow showers",
    95: "Thunderstorm",
    96: "Thunderstorm with slight hail",
    99: "Thunderstorm with heavy hail",
  }
  return conditions[code] || "Unknown"
}
天気ツールで何が起こっているのか?
- ツール定義 – Mastra の createTool を使用してツールのインターフェースを定義します。
- 入力スキーマ – ツールが位置情報文字列を受け取ることを指定します。
- 出力スキーマ – 返される天気データの構造を定義します。
- API 統合 – Open-Meteo の無料天気 API からデータを取得します。
- データ処理 – 天気コードを人間が読みやすい形式に変換します。
エージェントの更新
次に、天気ツールを使用するようにエージェントを更新しましょう。src/agent.ts を更新します :
import { weatherTool } from "./tools/weather.tool" // <--- Import the tool

export const agent = new MastraAgent({
  agent: new Agent({
    // ...

    tools: { weatherTool }, // <--- Add the tool to the agent

    // ...
  }),
  threadId: "main-conversation",
})
CLI を更新してツールを処理させる
src/index.ts 内の CLI インターフェースを更新して、ツールイベントを処理させます :
// Add these new event handlers to your agent.runAgent call:
await agent.runAgent(
  {}, // No additional configuration needed
  {
    // ... existing event handlers ...

    onToolCallStartEvent({ event }) {
      console.log("🔧 Tool call:", event.toolCallName)
    },
    onToolCallArgsEvent({ event }) {
      process.stdout.write(event.delta)
    },
    onToolCallEndEvent() {
      console.log("")
    },
    onToolCallResultEvent({ event }) {
      if (event.content) {
        console.log("🔍 Tool call result:", event.content)
      }
    },
  }
)
天気ツールのテスト
アプリケーションを再起動して、天気について尋ねてみてください :
pnpm dev
Try questions like:
- “What’s the weather like in London?”
- “How’s the weather in Tokyo today?”
- “Is it raining in Seattle?”
You’ll see the agent use the weather tool to fetch real data and provide detailed responses!
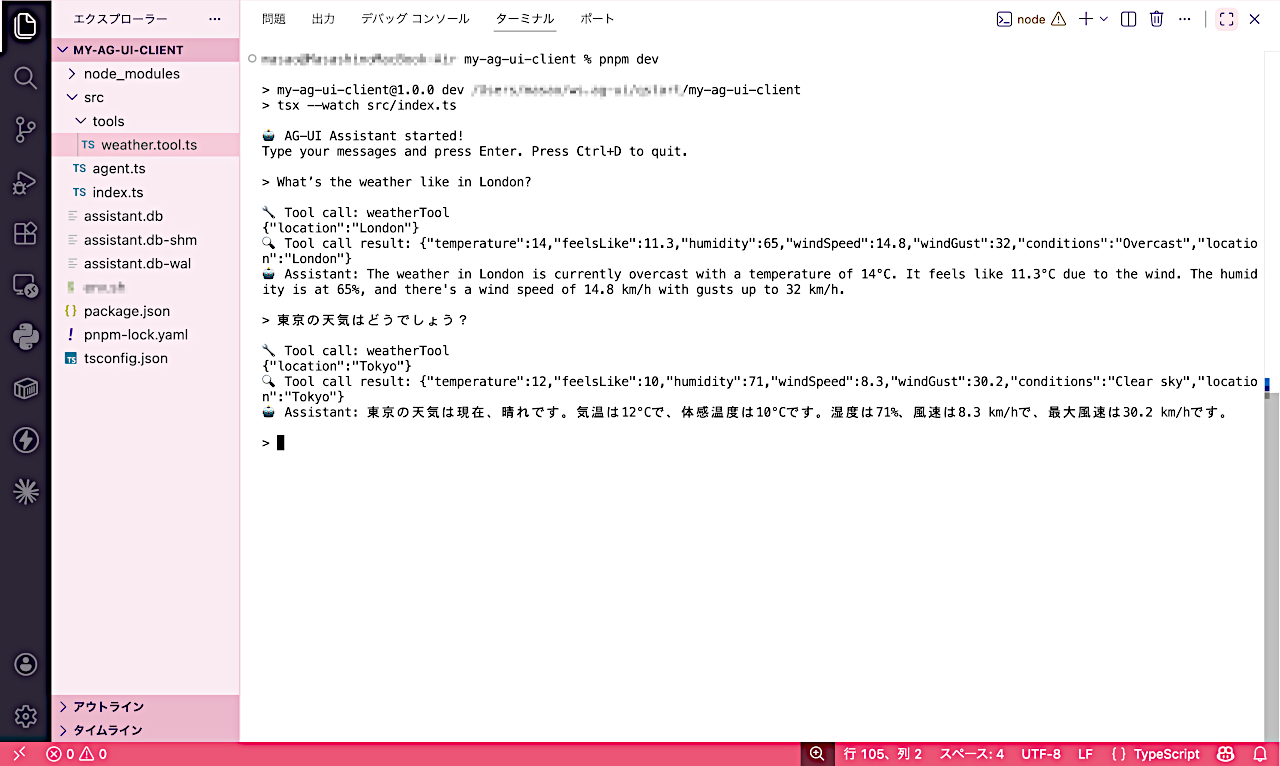
出力例
🤖 AG-UI Assistant started!
Type your messages and press Enter. Press Ctrl+D to quit.

> What’s the weather like in London?

🔧 Tool call: weatherTool
{"location":"London"}
🔍 Tool call result: {"temperature":14,"feelsLike":11.3,"humidity":65,"windSpeed":14.8,"windGust":32,"conditions":"Overcast","location":"London"}
🤖 Assistant: The weather in London is currently overcast with a temperature of 14°C. It feels like 11.3°C due to the wind. The humidity is at 65%, and there's a wind speed of 14.8 km/h with gusts up to 32 km/h.

> 東京の天気はどうでしょう?

🔧 Tool call: weatherTool
{"location":"Tokyo"}
🔍 Tool call result: {"temperature":12,"feelsLike":10,"humidity":71,"windSpeed":8.3,"windGust":30.2,"conditions":"Clear sky","location":"Tokyo"}
🤖 Assistant: 東京の天気は現在、晴れです。気温は12°Cで、体感温度は10°Cです。湿度は71%、風速は8.3 km/hで、最大風速は30.2 km/hです。

>
Step 8 – より多くの機能の追加
ブラウザツールの作成
Web ブラウジング機能を追加しましょう。まず、open パッケージをインストールしてください :
pnpm add open
Create src/tools/browser.tool.ts:
import { createTool } from "@mastra/core/tools"
import { z } from "zod"
import open from "open"

export const browserTool = createTool({
  id: "open-browser",
  description: "Open a URL in the default web browser",
  inputSchema: z.object({
    url: z.url().describe("The URL to open"),
  }),
  outputSchema: z.object({
    success: z.boolean(),
    message: z.string(),
  }),
  execute: async (inputData) => {
    try {
      await open(inputData.url)
      return {
        success: true,
        message: `Opened ${inputData.url} in your default browser`,
      }
    } catch (error) {
      return {
        success: false,
        message: `Failed to open browser: ${error}`,
      }
    }
  },
})
エージェントを両方のツールで更新
src/agent.ts を更新して、両方のツールを含めるようにします :
import { Agent } from "@mastra/core/agent"
import { MastraAgent } from "@ag-ui/mastra"
import { Memory } from "@mastra/memory"
import { LibSQLStore } from "@mastra/libsql"
import { weatherTool } from "./tools/weather.tool"
import { browserTool } from "./tools/browser.tool"

export const agent = new MastraAgent({
  resourceId: "cliExample",
  agent: new Agent({
    id: "ag-ui-assistant",
    name: "AG-UI Assistant",
    instructions: `
      You are a helpful assistant with weather and web browsing capabilities.

      For weather queries:
      - Always ask for a location if none is provided
      - Use the weatherTool to fetch current weather data

      For web browsing:
      - Always use full URLs (e.g., "https://www.google.com")
      - Use the browserTool to open web pages

      Be friendly and helpful in all interactions!
    `,
    model: "openai/gpt-4o",
    tools: { weatherTool, browserTool }, // Add both tools
    memory: new Memory({
      storage: new LibSQLStore({
        id: "storage-memory",
        url: "file:./assistant.db",
      }),
    }),
  }),
  threadId: "main-conversation",
})
Now you can ask your assistant to open websites: “Open Google for me” or “Show me the weather website”.
Step 9 – クライアントの配備
クライアントの構築
Create a production build:
pnpm build
スタートアップ・スクリプトの作成
package.json に以下を追加します :
{
  "bin": {
    "weather-assistant": "./dist/index.js"
  }
}
shebang をビルドされた dist/index.js に追加します :
#!/usr/bin/env node
// ... rest of your compiled code
実行可能にします :
chmod +x dist/index.js
グローバルにリンクする
CLI をグローバルにインストールします :
pnpm link --global
Now you can run weather-assistant from anywhere!
以上